
Accounts
Review the transactions your bank and cards send in, categorize them, and post them to your books.
In the app: Overview › Accounts
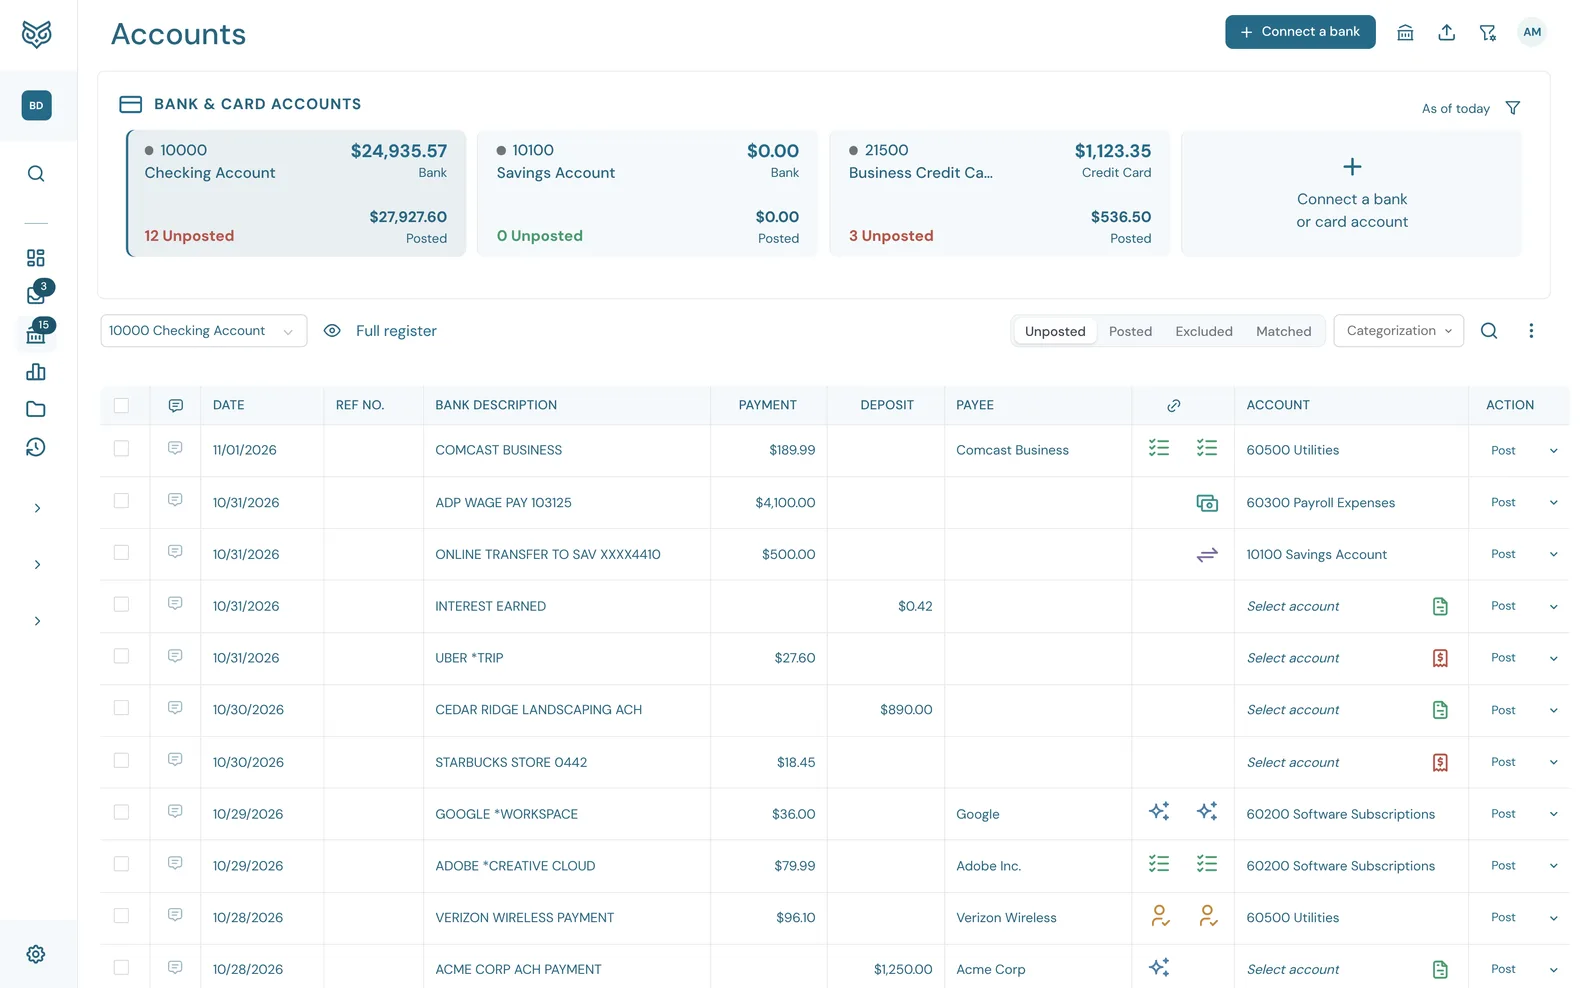
The Accounts page is where most day-to-day bookkeeping happens. Transactions from your bank feeds and uploaded statements arrive here as Unposted. For each one you check who it was with (the payee) and what it was for (the account), then Post it into your books. Bank rules and WizeBooks' own suggestions fill in most of them for you.
Title bar

- Connect a bank links a new bank or credit card account. See Connect your bank.
- Bank connections lists every connection with its status. Check now looks for new transactions, Edit accounts changes which account in your books each one feeds, and Fix connection appears when a bank needs you to sign in again.
- Upload statement imports a CSV or PDF statement, for a bank you haven't connected or for older history. WizeBooks works out the columns and signs itself. If it gets a statement wrong, Adjust import settings lets you choose the account, flip the signs, or say which CSV column is which.
- Bank rules opens Bank Rules.
Bank & card accounts
One tile for each bank and card account. Choose a tile to list that account's transactions below.
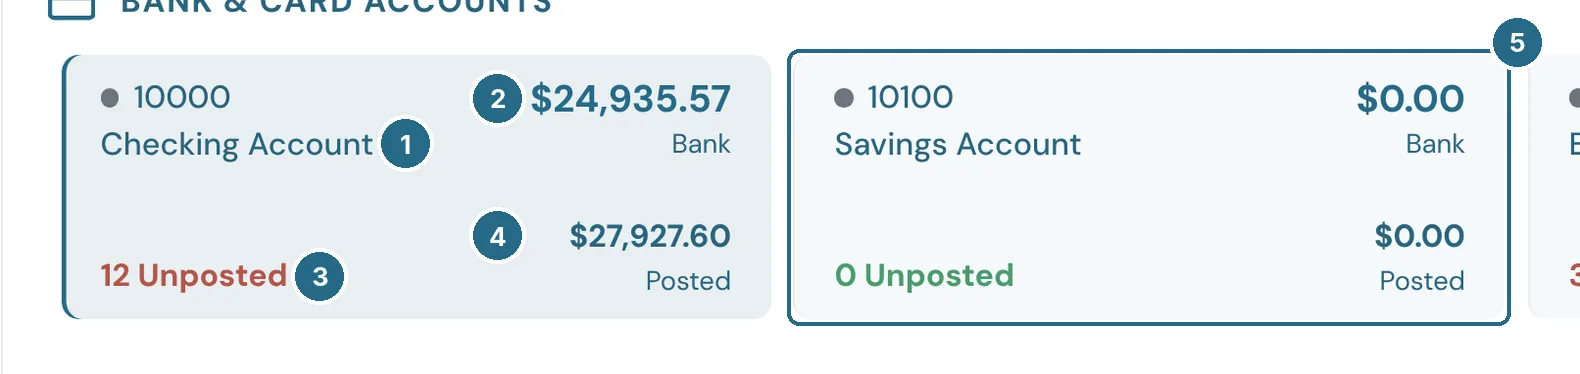
- The account's number and name.
- The bank balance: what the bank last reported.
- How many transactions are waiting to be posted. Red means there's work to do; green 0 Unposted means you're caught up.
- The posted balance: what's in your books. Once everything is posted and reconciled, it matches the bank balance.
- Choose another tile to switch accounts. The selected tile is shaded.
The balances are as of today. The funnel at the top right of the card chooses which accounts get a tile; it turns blue while some are hidden. The last tile, Connect a bank or card account, does the same as the button in the title bar.
The toolbar
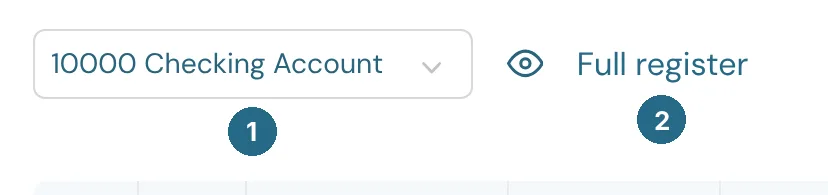
- Account picker: the account whose transactions are listed. The same as choosing its tile.
- Full register opens the account's complete register in a new tab (unless you've turned that off under Settings › Company). It holds everything posted to the account from anywhere in WizeBooks, including reconciled transactions.
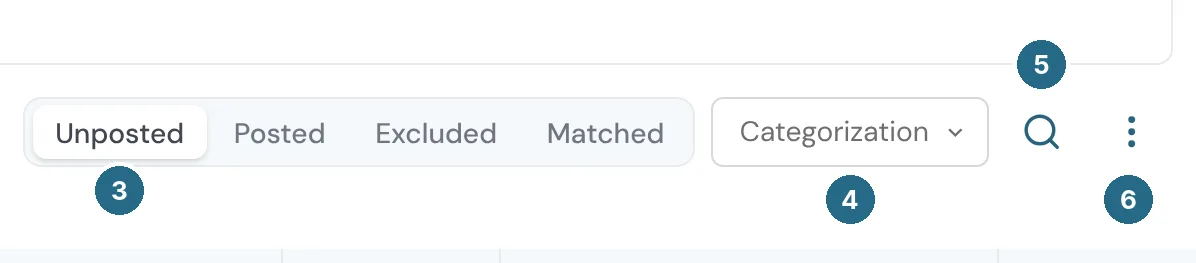
- Which transactions to list: Unposted (waiting for you), Posted (in your books), Excluded (kept out of your books, such as duplicates) or Matched (the second copy of a transfer, or a bank line matched to an invoice or bill, explained below).
- Categorization lists only the transactions whose payee or account was filled in a certain way: Auto, Rule, Auto-post, Self, Transfer, Payroll or None. See How it was categorized.
- Search finds transactions by their text or amount.
- More options: Print, Export to Excel, Export to CSV, Paste transactions from Excel, which columns to show, the Page size (50 to 500 rows) and the Row height.
The transaction list
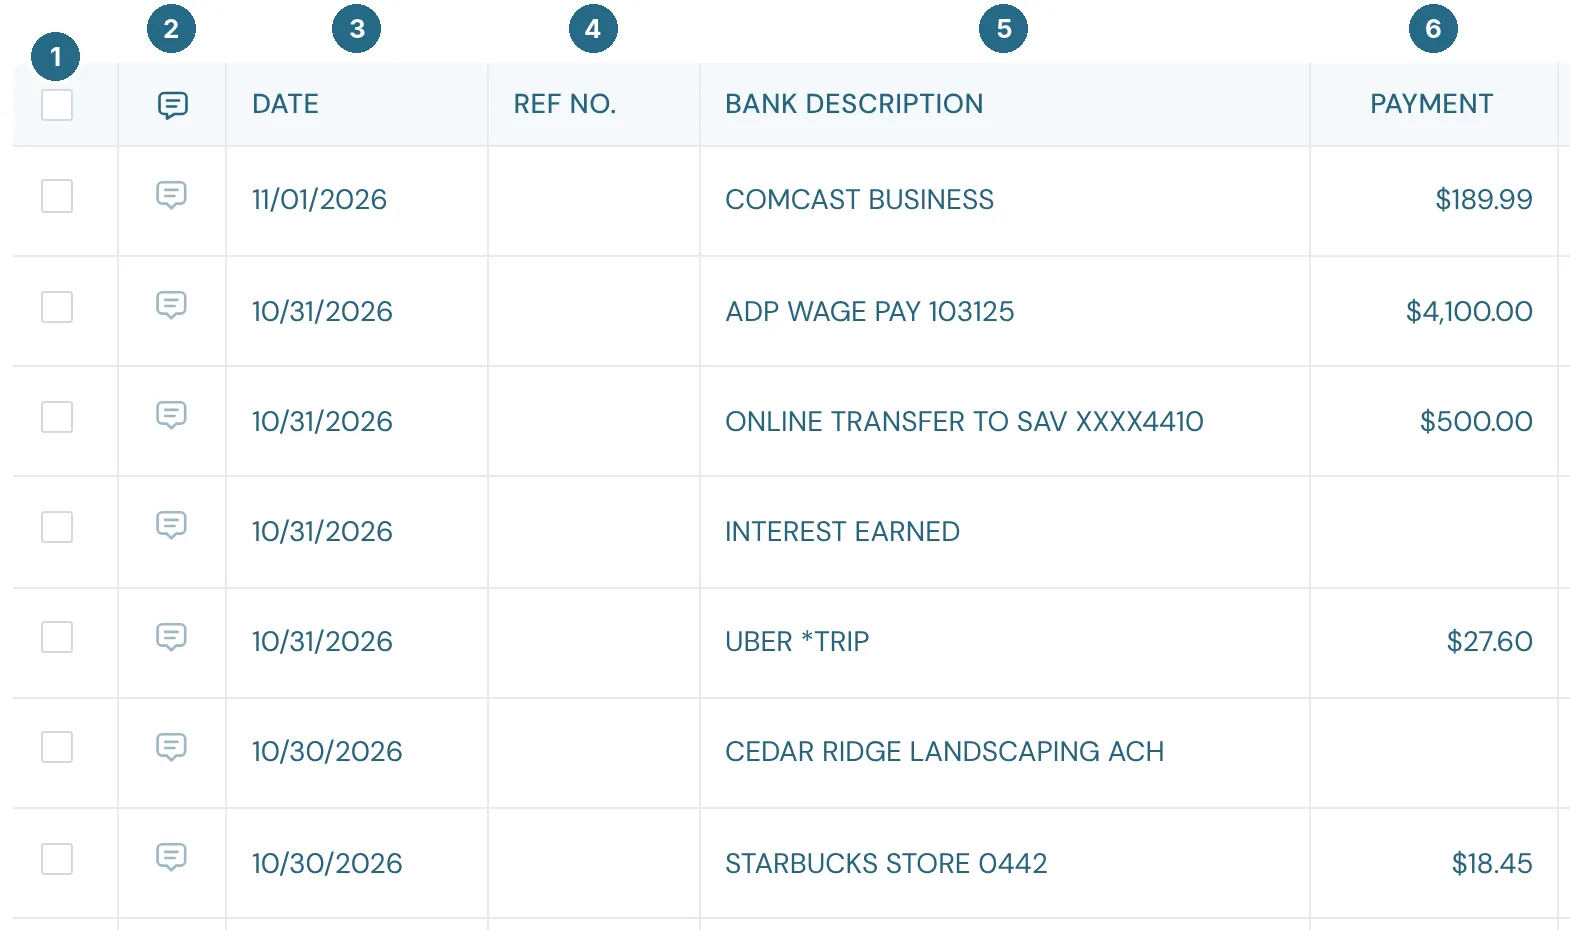
- Select: tick transactions to post, exclude or edit several at once. The box in the heading selects every transaction shown.
- Comments: add a note or a question for your team or your accountant. Open comments also appear in Inbox › Comments.
- Date the bank says it happened.
- Ref no.: a check number or your own reference.
- Bank description: the bank's own text for it. It can't be changed, and bank rules match on it.
- Payment: money out of the account.
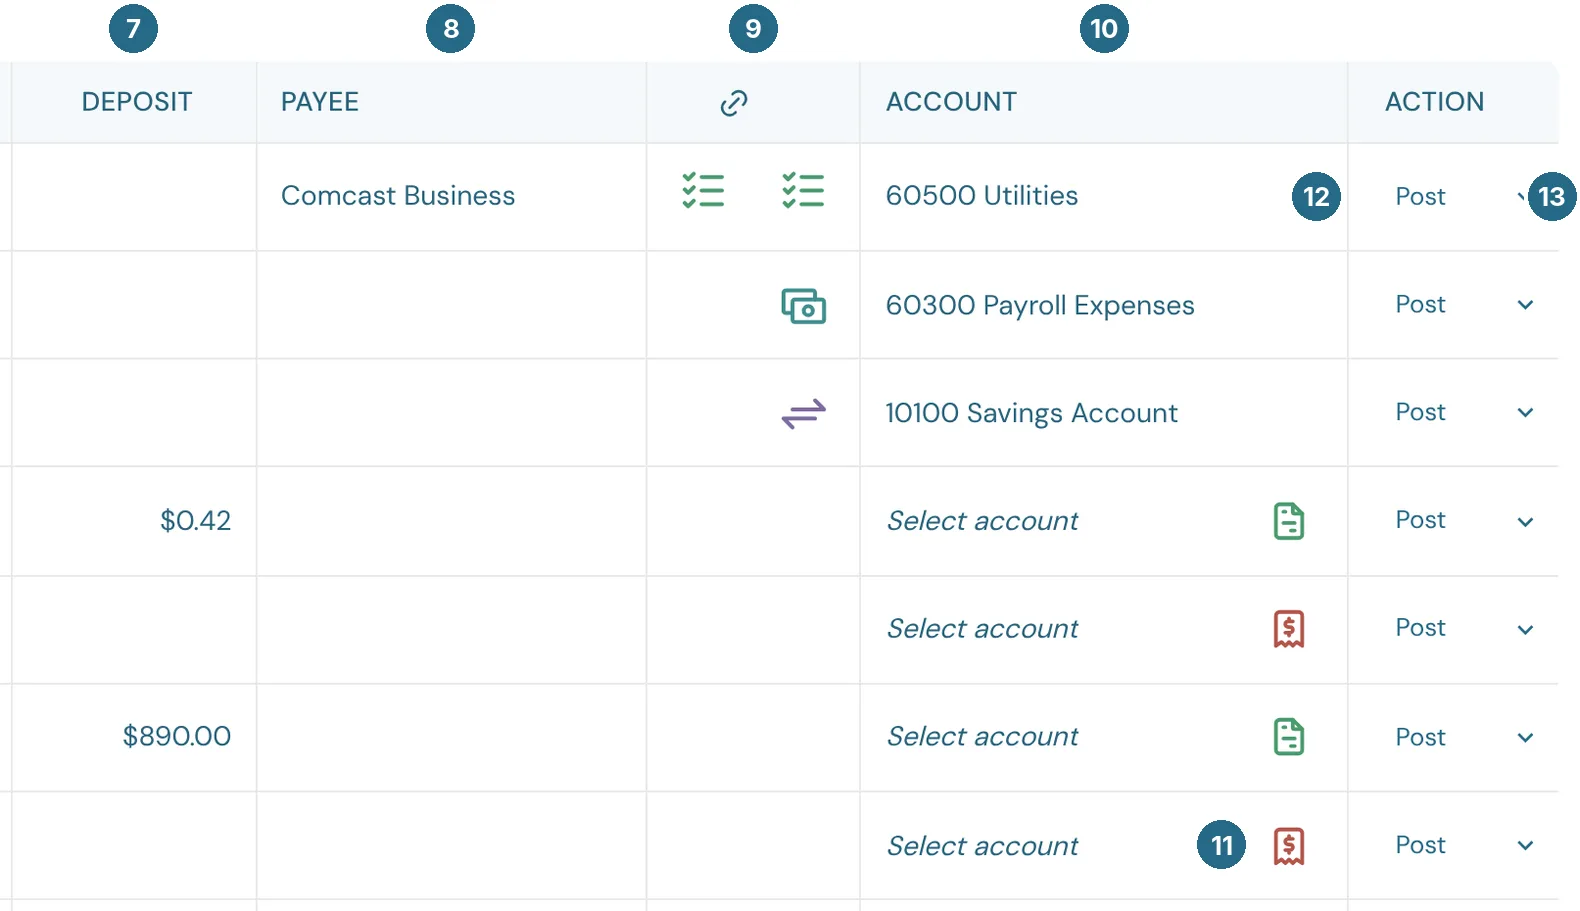
- Deposit: money into the account. (On a credit card these read Charge and Payment.)
- Payee: who the money went to or came from.
- How it was categorized: two icons, the first for the payee and the second for the account. See below.
- Account: the category the transaction will post to, such as Utilities or Service Revenue. *Select account* means nothing has been chosen yet.
- Match (
 for money out,
 for money in): links the transaction to an open bill or invoice you've already entered, instead of recording it a second time. When the bank text holds an invoice number, WizeBooks shows that invoice's number here as a shortcut.
- Post puts the transaction in your books with the payee and account shown.
- The arrow beside Post opens more actions. See Post, exclude and rules.
A shortcut for fast review: click a Date, Ref no., amount, Payee or Account cell to change just that field without opening the transaction. Press Tab after choosing the account and the focus lands on Post, so Enter posts it.
How it was categorized
Each transaction shows two icons, one for how its payee was filled in and one for its account. Hover over an icon to see what it means. They're usually the same, but they don't have to be: a bank rule might set only the account, and you might choose the payee yourself.
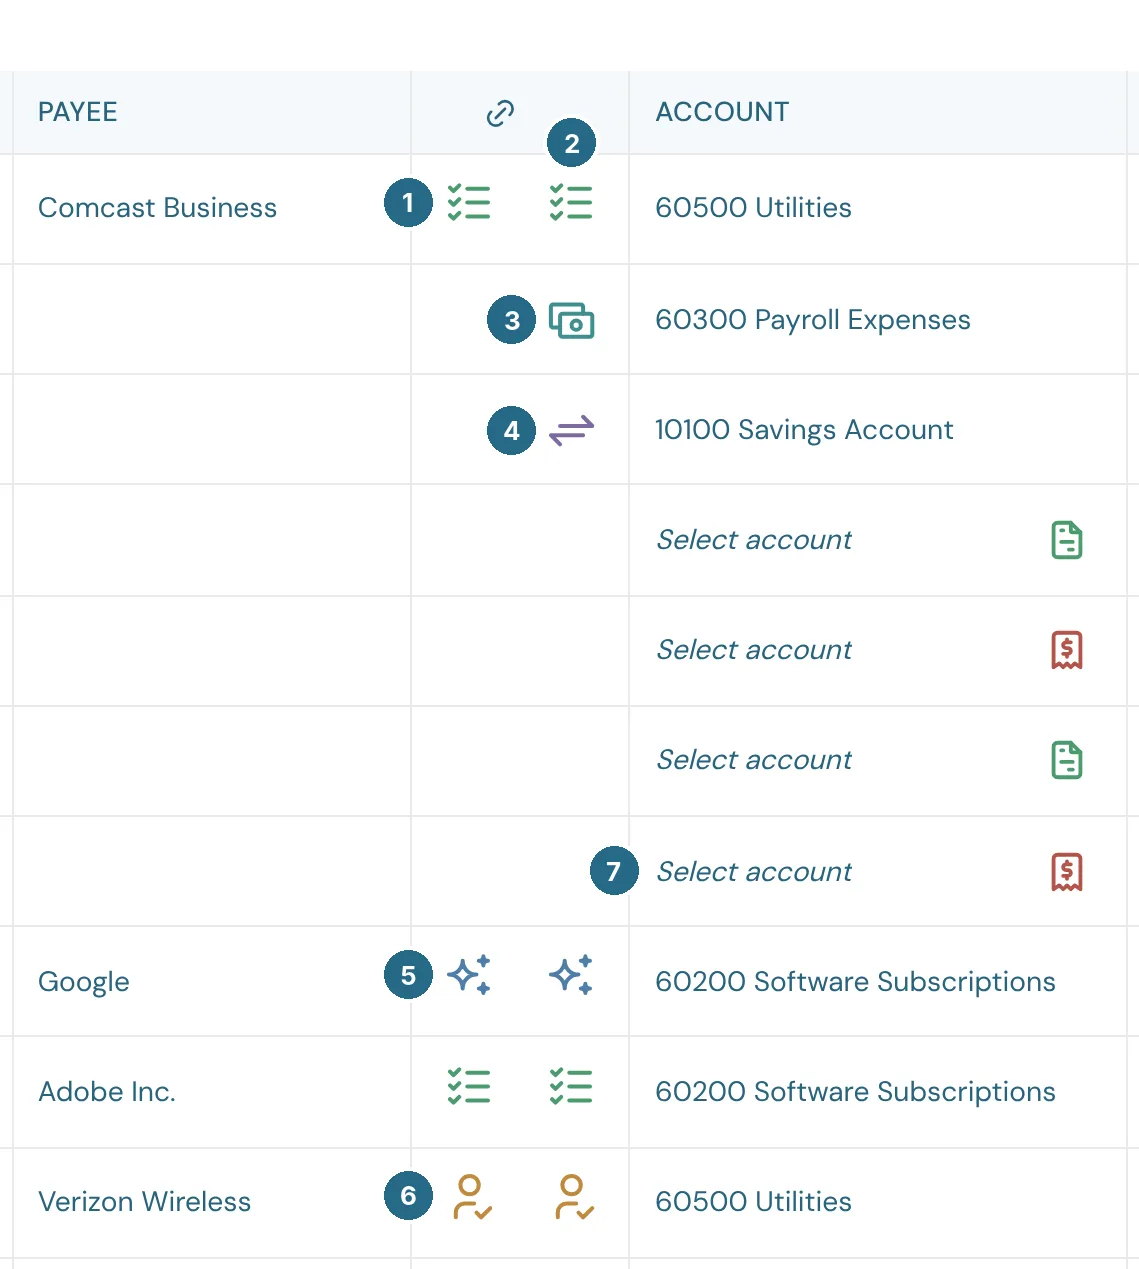
- The payee's icon.
- The account's icon.
 Payroll suggestion (teal): WizeBooks recognized a payroll provider's withdrawal and filed it to your payroll accounts. See Accounting settings › Payroll.
 Transfer (purple): money moving between two of your own accounts, such as checking to savings or paying the credit card. WizeBooks pairs the two sides when both accounts are connected, so the transfer is only counted once.
 Auto-categorized (blue): WizeBooks' suggestion, based on how you've filed this payee or this bank text before. Check it before posting.
 Self-categorized (orange): you, or someone on your team, chose it by hand.
- No icon: nothing has been chosen yet.
The others you'll see:
 Rule-categorized (green list): a bank rule filled it in. The Comcast row above, marked 1 and 2, has a rule for both sides.
 Auto-posted by a bank rule (green circle): a rule with Auto-post turned on posted it without waiting for review. These are in the Posted list.
 Manual entry (grey pencil): a transaction someone entered by hand rather than one from the bank.
Choosing the payee
Click the Payee cell to open the payee list.
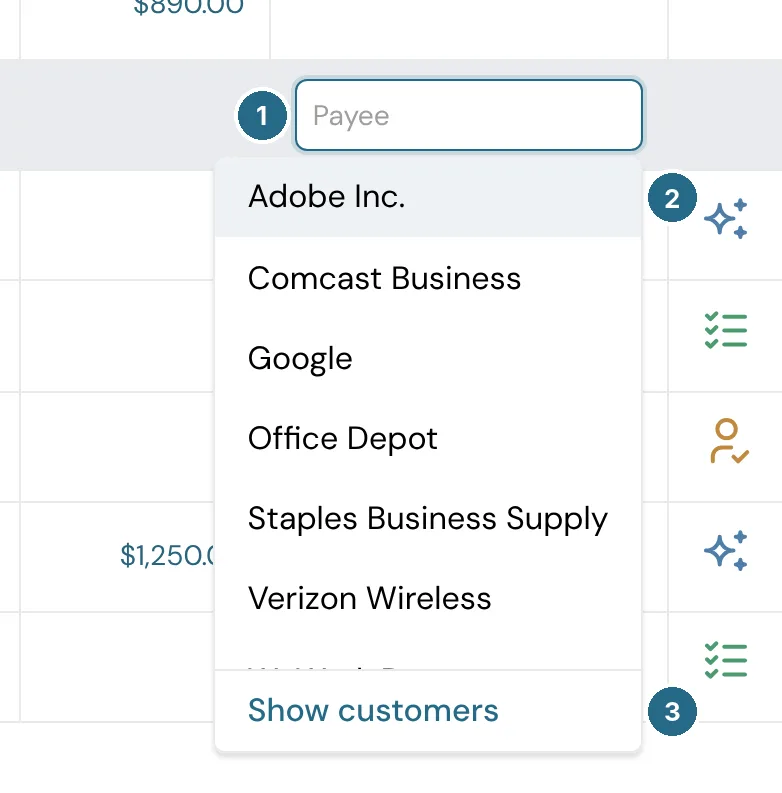
- Type to search. Picking a payee also fills in the account they're usually filed to, if no account has been chosen yet.
- The list shows vendors for money out and customers for money in, since that's almost always who it is.
- Show customers (or Show vendors) swaps the list, for the exceptions: a refund to a customer goes out, and a refund from a vendor comes in.
Adding a new payee
Type a name that isn't on the list and two ways to add it appear:
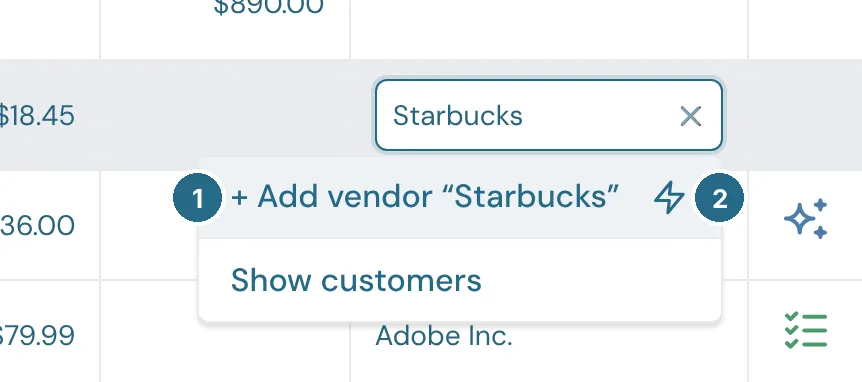
- + Add vendor "Starbucks" (or Add customer) opens the full New vendor form, filled in with the name, so you can add their email, address, terms and default expense category before saving.
- The lightning button
 is the quick add: it saves a vendor with just the name, picks it, and you carry on. Pressing Tab does the same. You can fill in the rest later from the vendor's own page. See The lightning buttons.
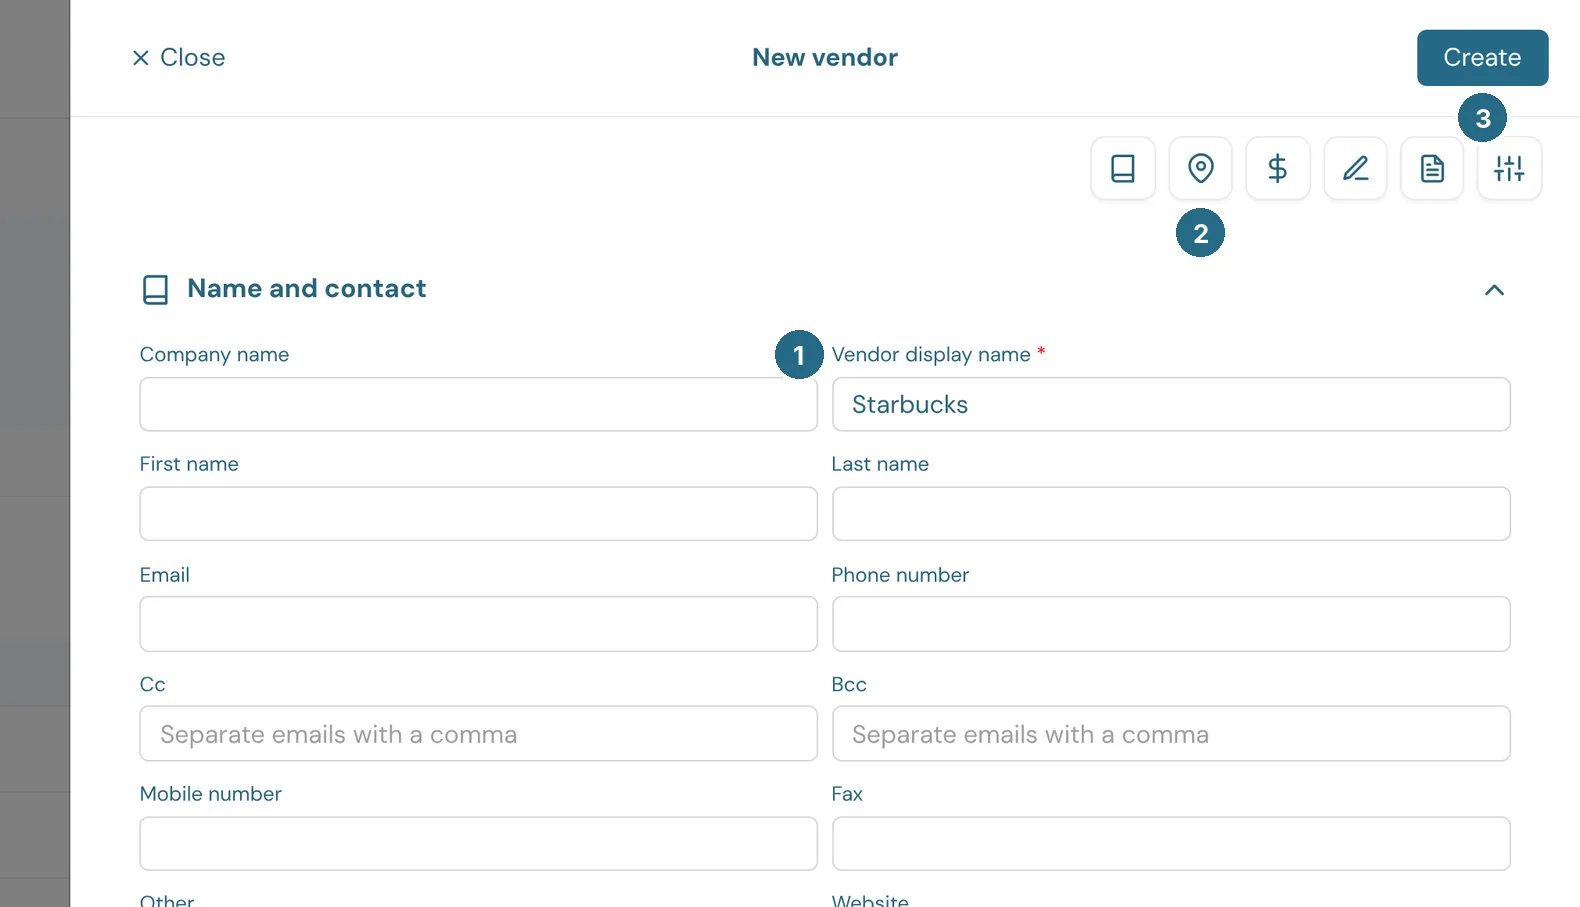
- Vendor display name is the only required field.
- The icons jump to each section of the form: name and contact, address, bill pay, notes and attachments, additional info (including terms and the default expense category) and custom fields.
- Create saves the vendor and puts them on the transaction.
Use quick add when you just need the name on the transaction now. Use the full form when you want the vendor set up properly from the start, for example with a Default expense category so their future bills and expenses fill in by themselves.
Choosing the account
Click the Account cell to open the account list.
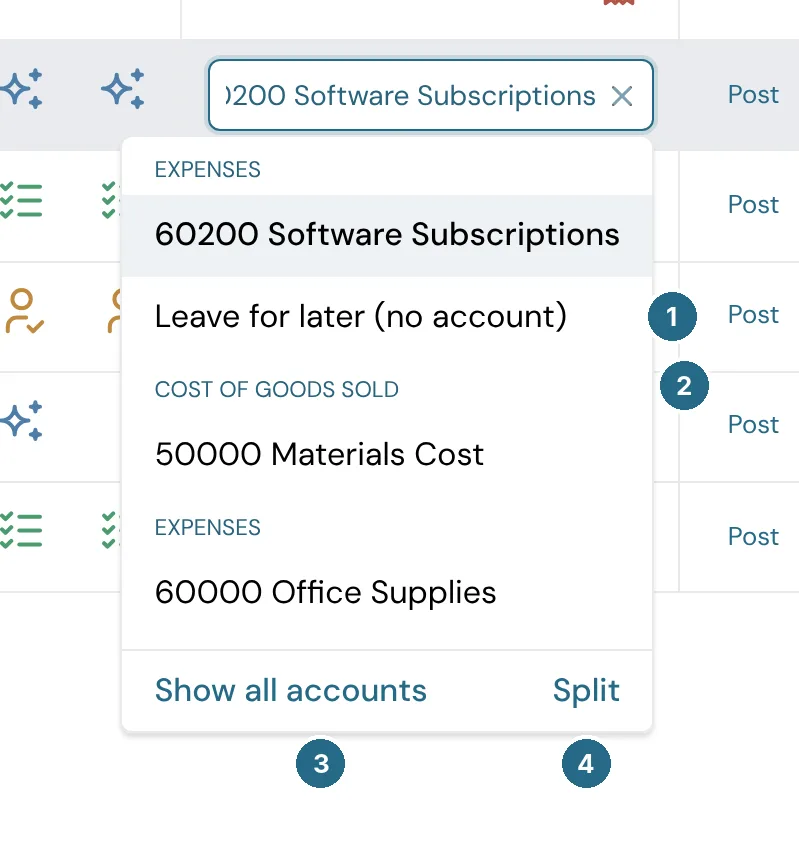
- Leave for later (no account) clears a choice so the transaction goes back to *Select account*.
- Accounts are grouped by type. For money out, the list shows only cost of goods sold and expense accounts. For money in, it shows income and asset accounts.
- Show all accounts lifts that filter for this one choice, for the exceptions, such as a loan payment or an owner's draw. The next transaction starts filtered again.
- Split opens the transaction in a form where you can divide it across several accounts. See Splitting a transaction.
Locked and inactive accounts never appear in the list.
Adding a new account
Type a name that isn't on the list and choose + Add account:
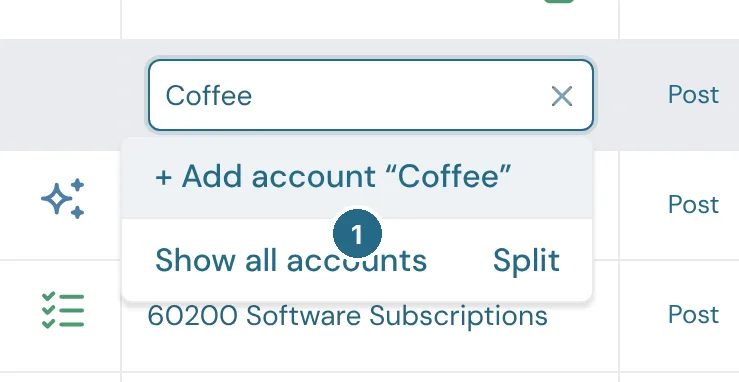
- + Add account "Coffee" opens the New account form with that name filled in.
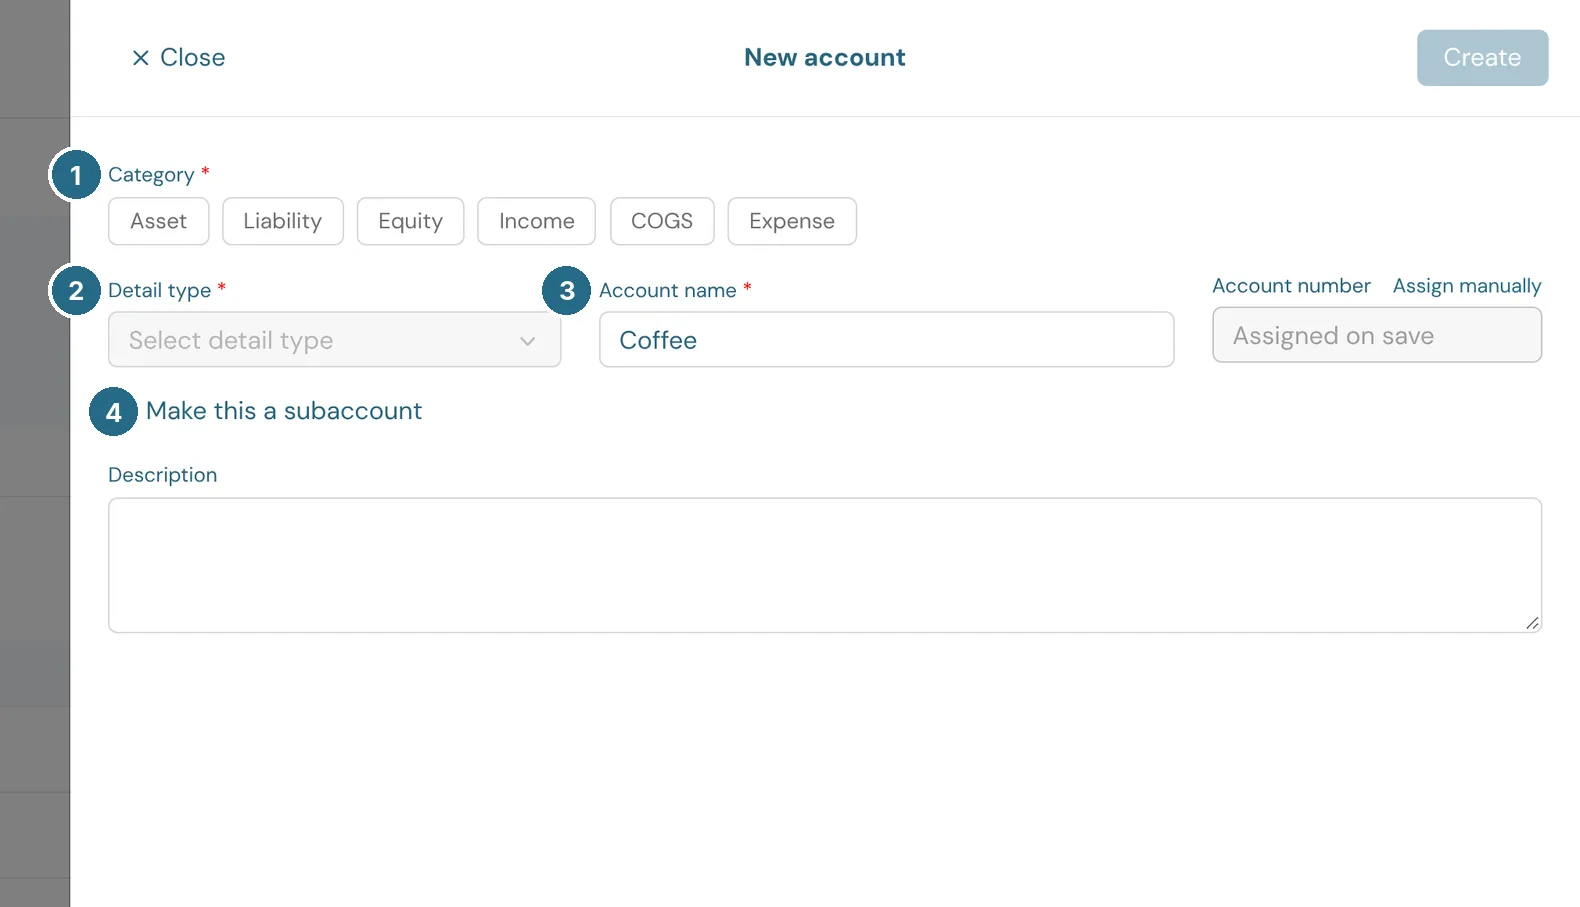
- Category: Asset, Liability, Equity, Income, COGS or Expense.
- Detail type: a more exact kind within the category, which decides where the account appears in reports.
- Account name, plus an Account number (WizeBooks can assign one).
- Make this a subaccount puts it under another account, such as Meals under Travel.
Saving it puts the new account straight on the transaction. Accounts have no name-only quick add, because the category and detail type decide where the money shows up in your reports. See Chart of accounts.
Opening a transaction
Click anywhere on a row other than the editable cells (the bank description, say) to open the whole transaction.
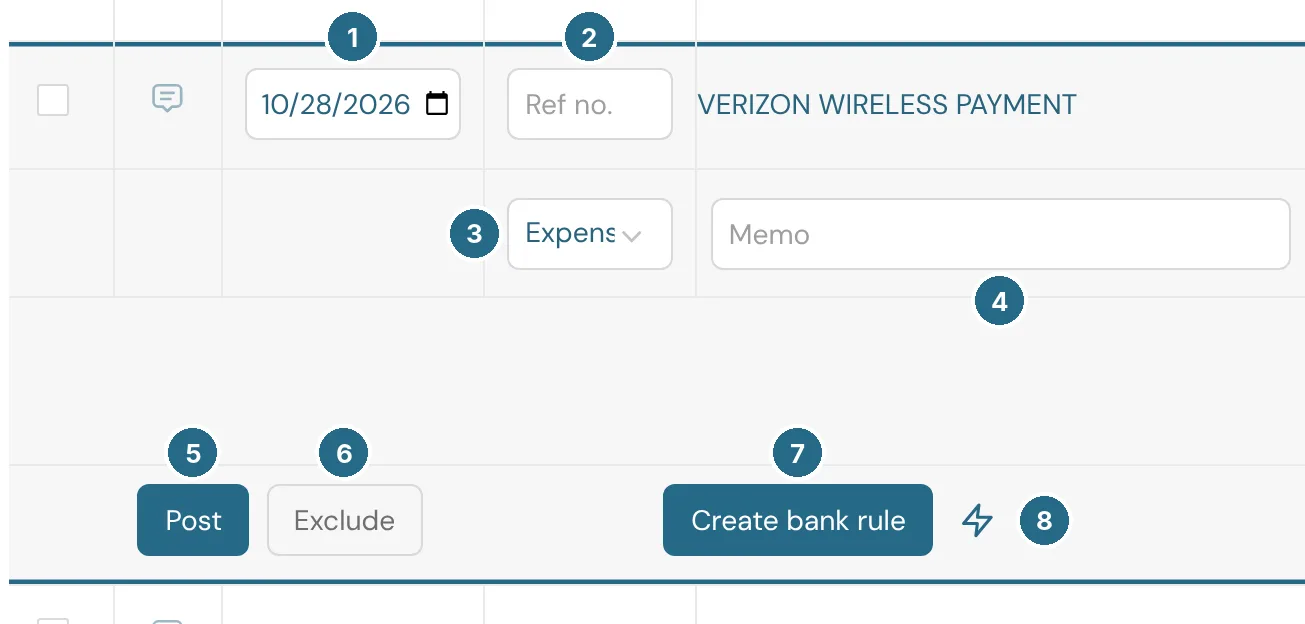
- Date.
- Ref no.
- Type: Expense, Sales or Transfer. It decides who the payee can be and which accounts are offered. A Transfer has no payee, and its account is one of your bank, card or other balance sheet accounts.
- Memo: your own note, kept with the transaction and shown in reports.
- Post puts it in your books.
- Exclude keeps it out of your books, for duplicates and personal spending. Excluded transactions move to the Excluded list and can be brought back.
- Create bank rule opens a new bank rule filled in from this transaction.
- The lightning button creates the rule and posts in one step. See Post, exclude and rules.
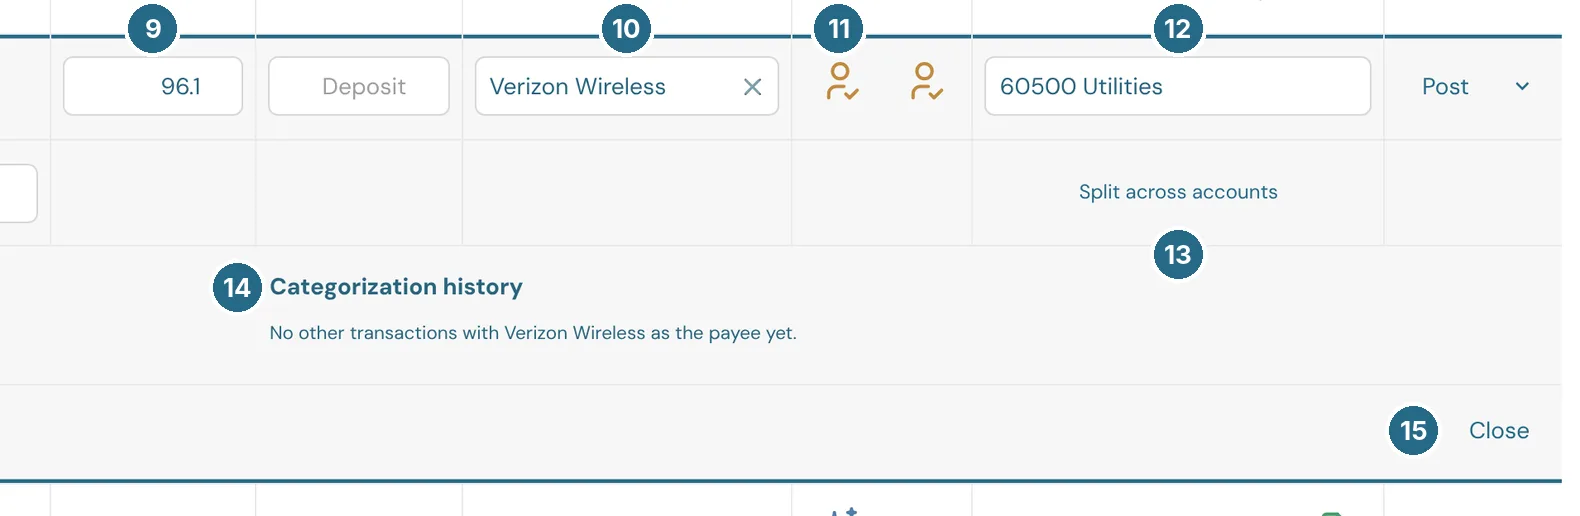
- Payment or Deposit: only one can hold an amount.
- Payee, the same list as above.
- How the payee and account were categorized.
- Account, the same list as above.
- Split across accounts opens the split form.
- Categorization history: every other transaction with this payee and the account it was posted to, so you can file this one the same way.
- Close folds the transaction back up (so does Esc).
Changes save as you make them. There's no Save button on an existing transaction. Your company's line-level custom fields, such as Class or Location, appear in a row under the transaction when you've set them up.
A transaction that came from an invoice payment, a bill payment or a journal entry opens read-only, with an Edit button that takes you to the document behind it. A reconciled transaction is locked until its reconciliation is undone. Posted transactions that aren't reconciled can be deleted from here.
Splitting a transaction
One bank charge sometimes covers several things, such as a store receipt with office supplies and a client gift. Split (in the account list) or Split across accounts (in an open transaction) opens it in the Expense form (or the Sales form, for money in).
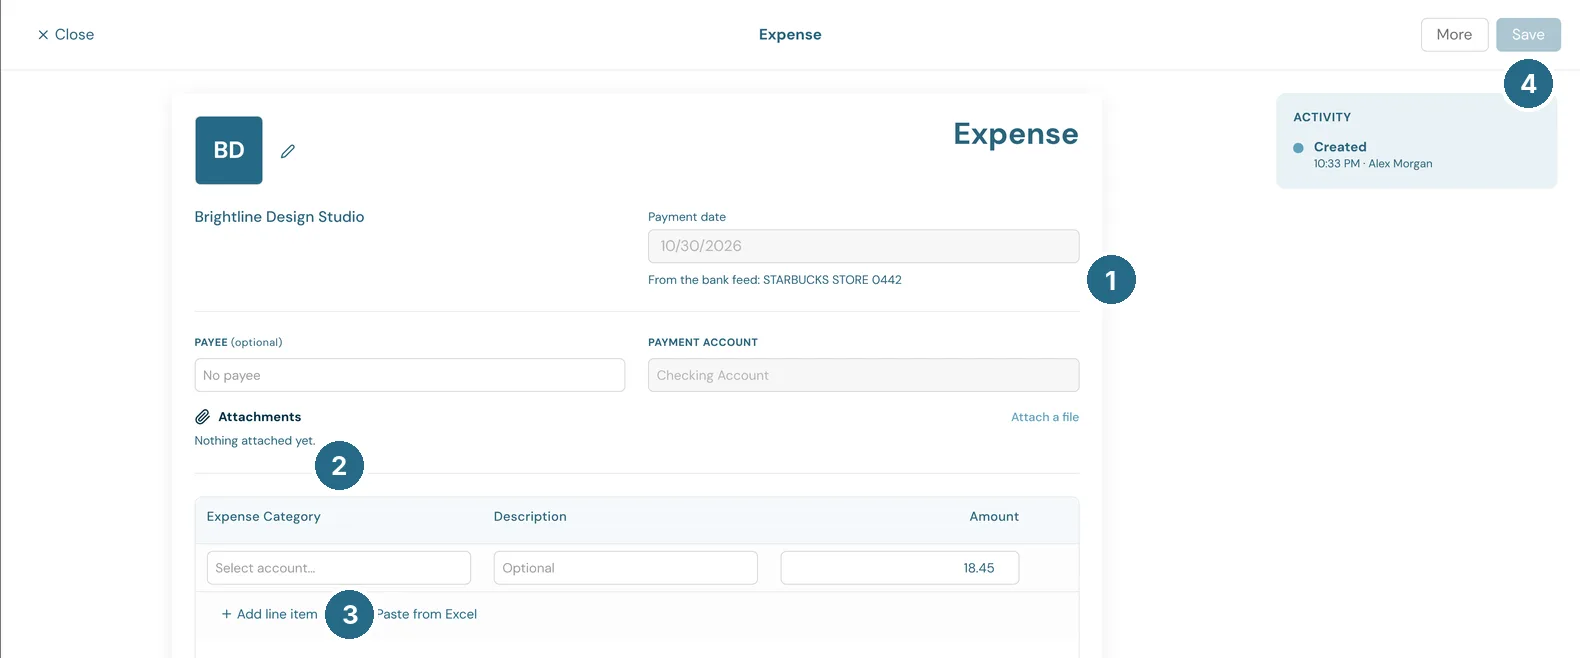
- The date and the bank account come from the bank feed and can't be changed.
- Each line has an Expense Category, a Description and an Amount.
- Add line item adds a line. The lines can use any account except a bank or card account, and must add up to the bank amount exactly.
- Save saves the split. It goes back to the list, ready for you to post there.
Post, exclude and rules
The arrow beside Post has the less common actions.

- Post puts the transaction in your books.
- Exclude keeps it out of your books.
- Create bank rule opens a new rule filled in from this transaction, for you to check and save. It reads Edit bank rule when a rule already matches the transaction.
- The lightning button is the quick rule: it creates the rule without asking, runs your rules over the other unposted transactions, and posts this one. It's only available once the transaction has an account.
- Categorization history: how every other transaction with this payee was filed.
Bank rule or quick rule?
Both make a rule from the transaction's own bank text: one contains condition for each meaningful word, plus its account and payee, named like "VERIZON WIRELESS PAYMENT → Utilities".
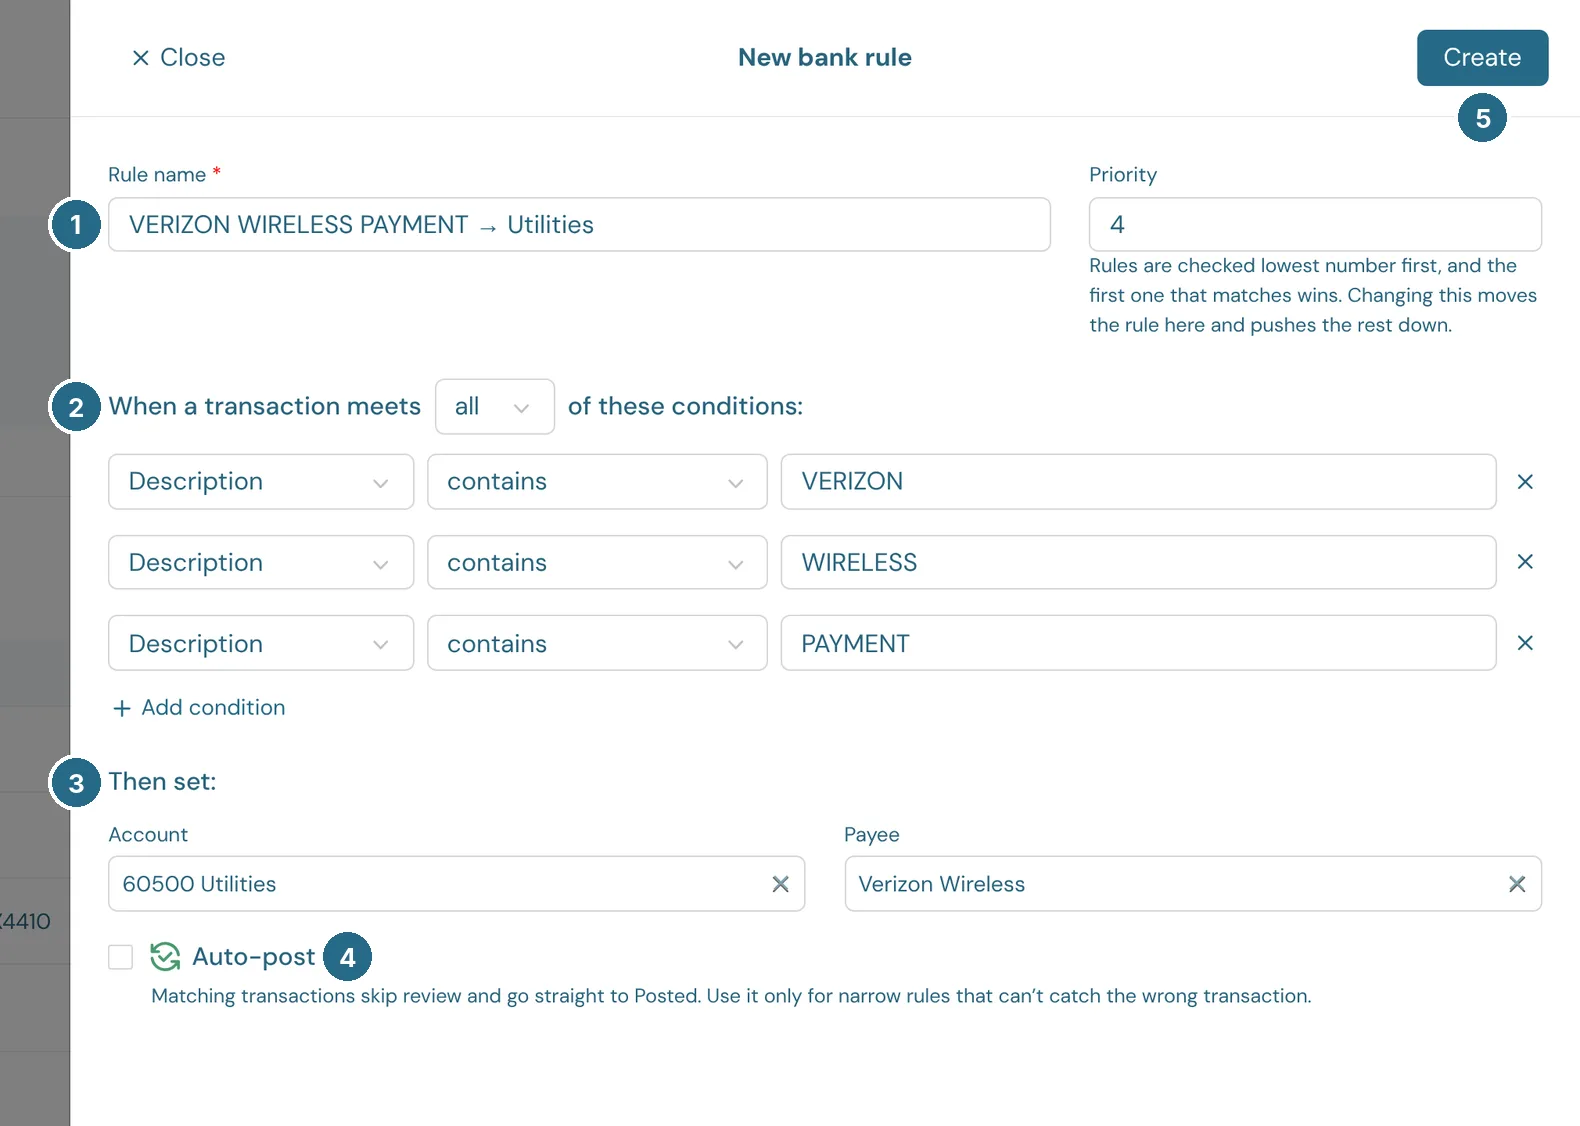
- Rule name, filled in for you.
- Conditions: what a future transaction's description (or amount) must contain. Remove words that change each time, such as dates or store numbers, so the rule keeps matching.
- Then set: the account and payee the rule fills in.
- Auto-post: matching transactions go straight to Posted without waiting for review. Only use it for rules that can't catch the wrong transaction.
- Create saves the rule, runs it over your unposted transactions, and posts this one.
Use Create bank rule when you want to check or loosen the conditions first. Use the quick rule when the transaction is clearly one that repeats, such as a monthly subscription, and its bank text is the same each time. If an identical rule already exists, the quick rule uses it rather than making a copy.
The lightning buttons
The lightning always means "do it now, skip the form". It shows up in three places. Hover over it to see what it will do.
Beside "+ Add vendor": quick add a payee
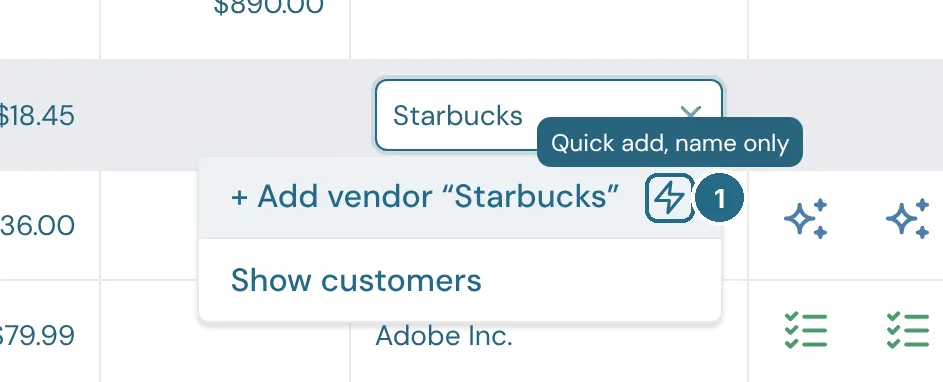
- Saves a new vendor (or customer, when the list shows customers) with just the name, puts it on the transaction, and closes the list. Tab does the same. Clicking + Add vendor "Starbucks" itself opens the full New vendor form instead. See Adding a new payee.
In the Post menu: quick rule
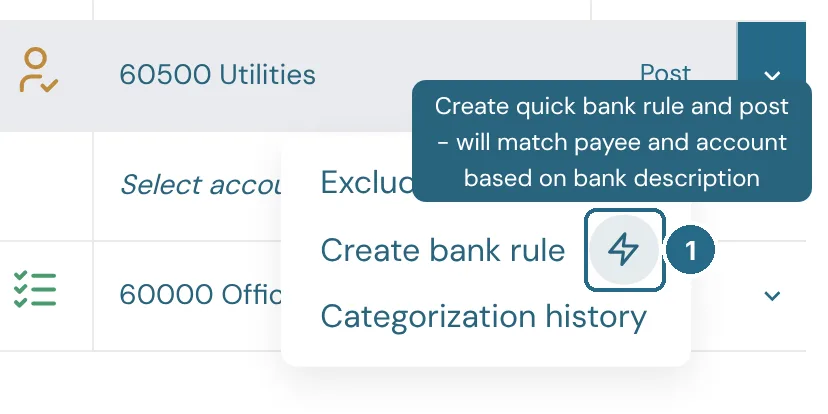
- Creates a bank rule from this transaction's bank description, payee and account without opening the rule form, runs your rules over the other unposted transactions, and posts this one. It's greyed out until the transaction has an account, and it's replaced by Edit bank rule when a rule already matches.
In an open transaction: quick rule
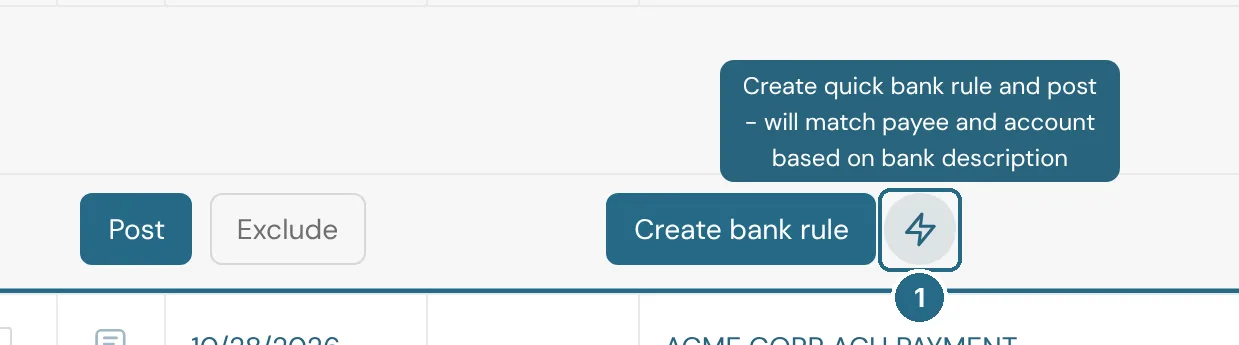
- The same quick rule as in the Post menu, beside Create bank rule at the bottom of an open transaction. Choose the payee and account first, then click it to make the rule and post in one go.
There is no lightning beside + Add account: a new account always opens the New account form, because its category and detail type decide where the money shows up in your reports. See Bank rule or quick rule? for when to use each kind of rule.
Matching to an invoice or bill
When a customer pays an invoice you've already sent, or you pay a bill you've already entered, don't post the bank line as new income or a new expense, or it will be counted twice. Use the match button instead.
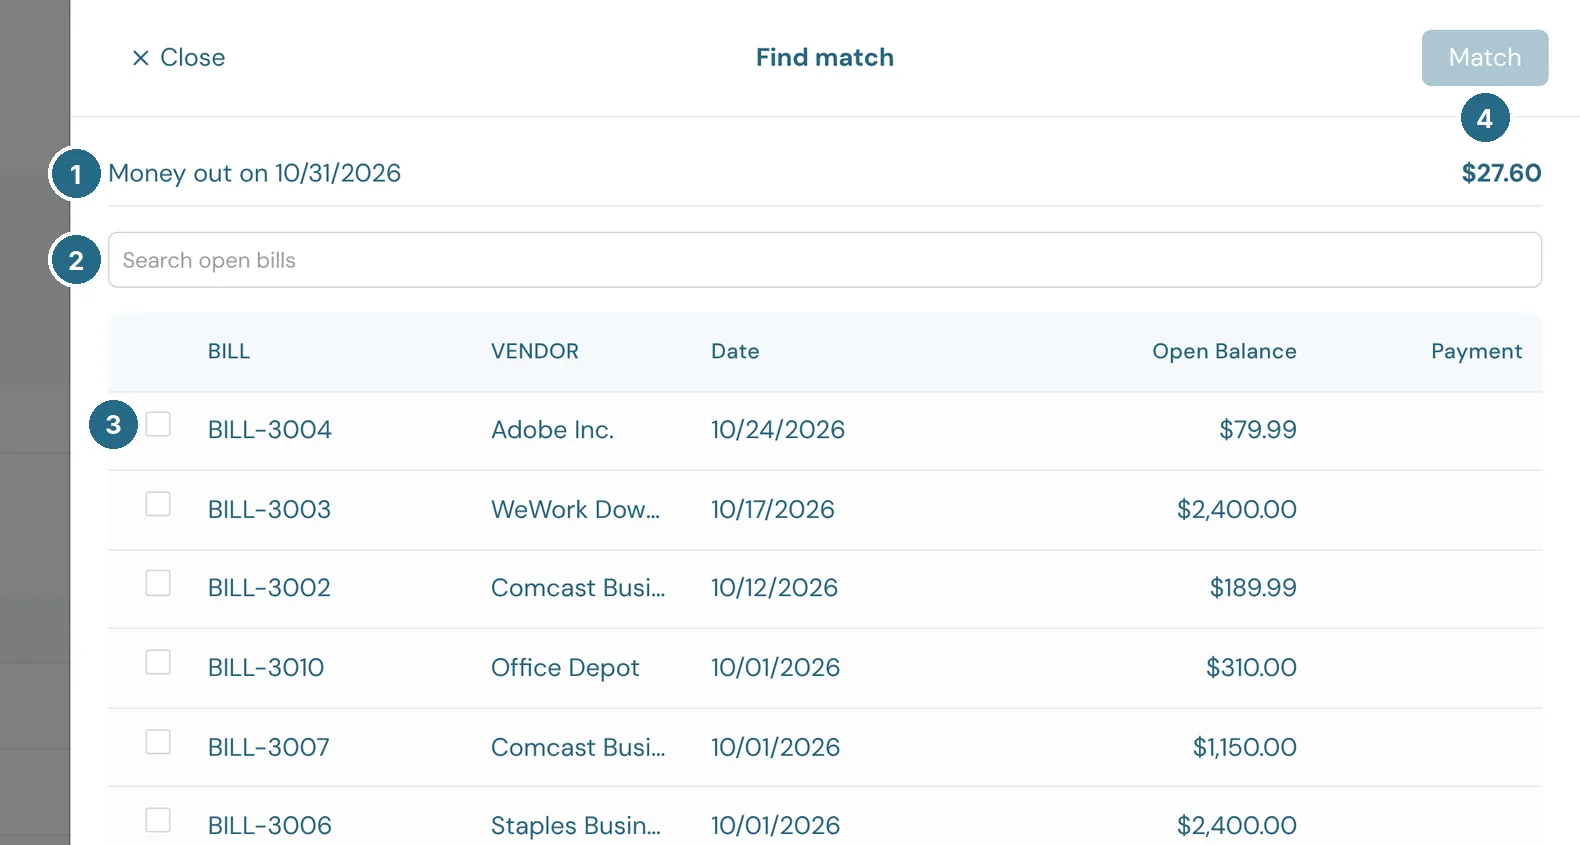
- The bank transaction: its date, direction and amount.
- Search the open bills (or invoices) by number, name or amount.
- Tick the bill or bills this payment covers. The Payment column shows how much goes to each one.
- Match records the payment against them, using the bank's date and amount. The bill is marked paid, and the bank line moves to Matched, where Undo match reverses it if it was wrong.
One payment can cover several bills or invoices, as long as they're all for the same vendor or customer.
Several at once
Tick transactions to act on them together:
- Batch Post posts them all. Its arrow has Batch Exclude.
- Batch actions opens one form for all of them. Tick the box beside each field you want to change, such as the payee or account, and leave the rest as they are.
Posted transactions can be taken back out of your books from the Posted list, unless they're reconciled or dated in a closed period.
Recording a transfer
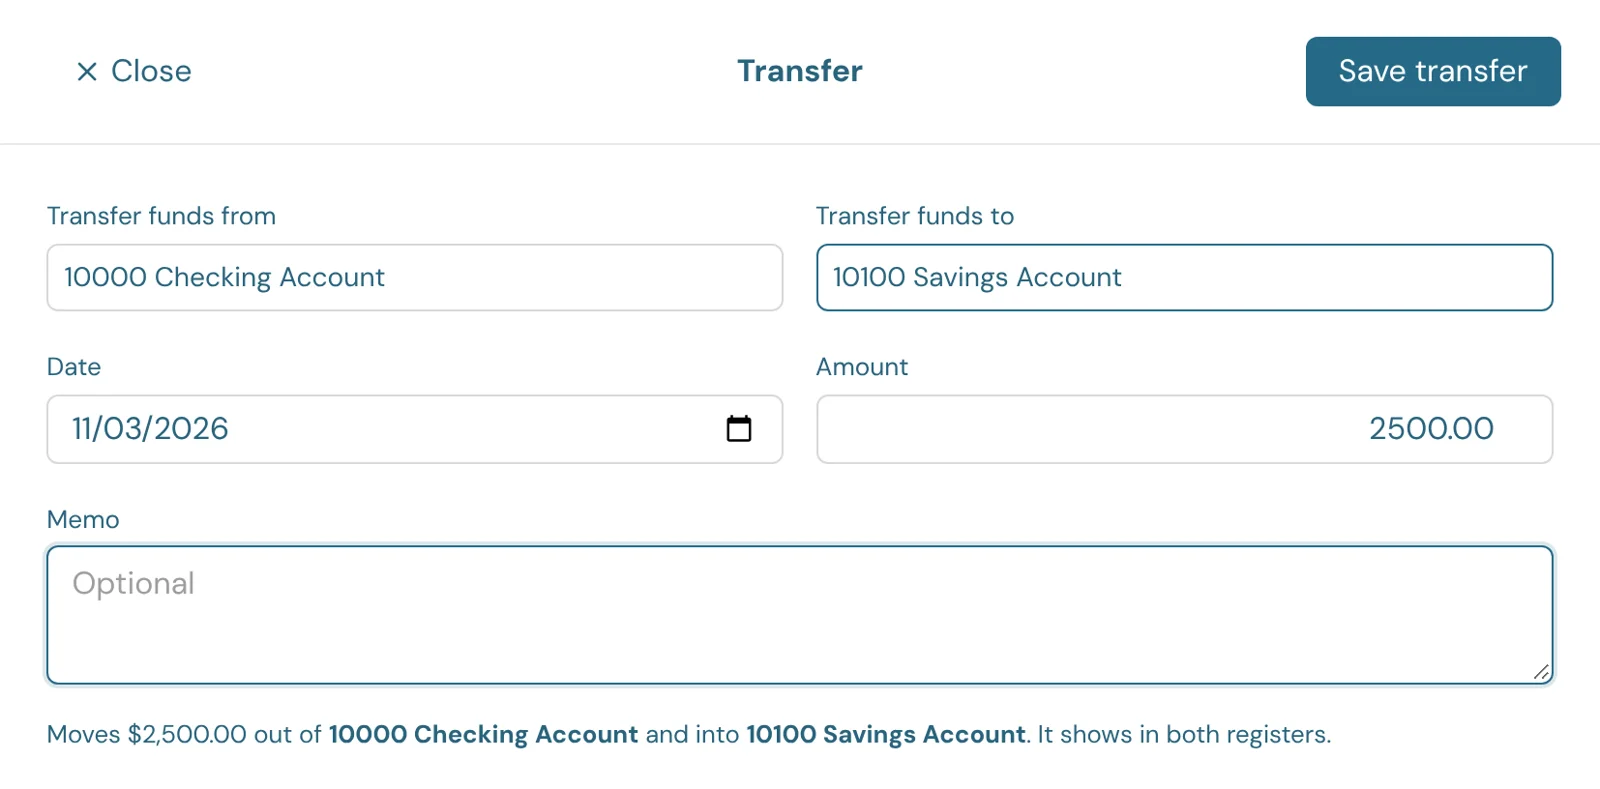
Most transfers come in from your bank feeds. To record one yourself, such as cash moved to savings or a loan payment from a bank that isn't connected, click + at the top of the menu and choose Transfer.
- Transfer funds from: where the money leaves. Bank, cash and card accounts come first, then your other balance sheet accounts (loans, owner's equity and so on).
- Transfer funds to: where it arrives.
- Date and Amount.
- Memo (optional). Left blank, it reads "Transfer from … to …".
It posts one entry that shows in both accounts' registers as a Transfer. Edit or delete it from either register. Income and expense accounts can't be used: that's an expense or a deposit, not a transfer.
Updated in v1.0.0